Another brilliant idea

I had a great idea, but not one so great that my foot fell off. Why not make a copy of the bracer in the British Museum?, I thought. It will be easy, I thought. I have the report with a nice clear drawing.

dalton

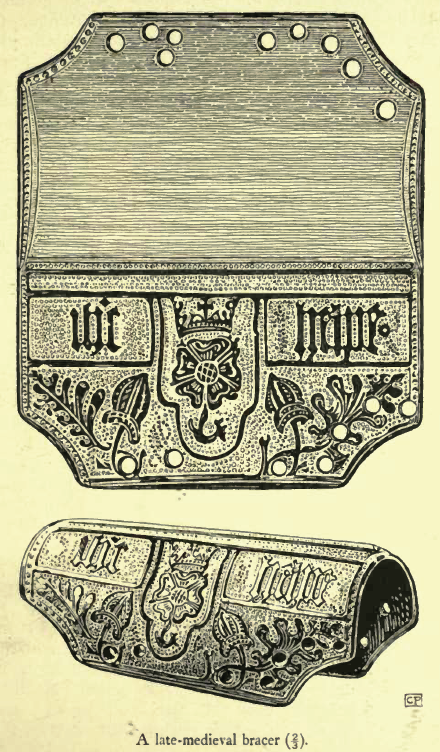
Dalton, Antiquities Journal, Volume 2, 1922 p209

It looks fine, right up to the point where you compare it with the photograph of the real thing…

dsc03790

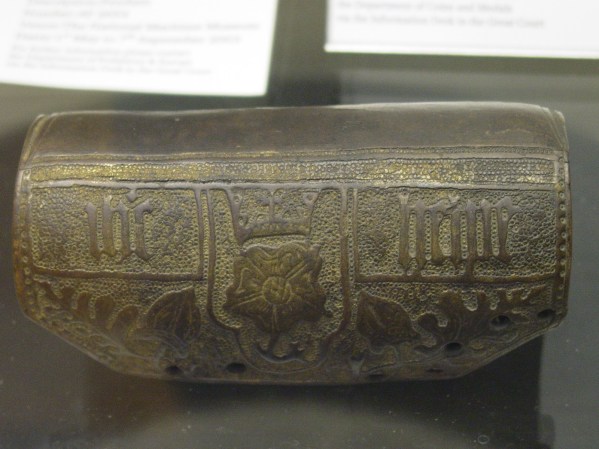
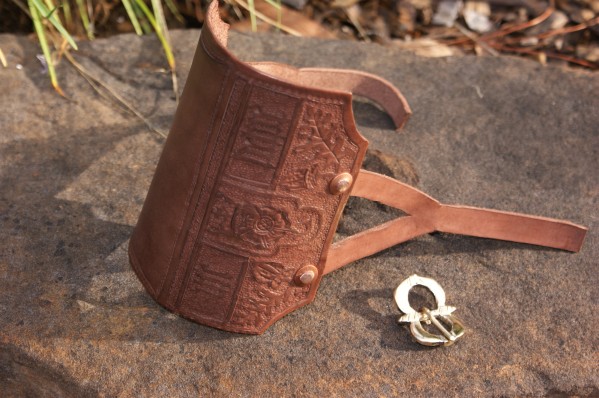
Bracer in the british Museum. My photo. That is an awful lot of gold.

When you try to use the published drawing, you find out there’s all these little fiddles like changing the size of the spots to make it work. The height of the decorated panel is okay but the two narrow ones above it are compressed. The lettering is all over the place as well and the sides of each panel don’t line up with each other in the same way they do on the original. Oh well, I’ll have to redraw it for the next one. The photo also shows how the gilding runs.

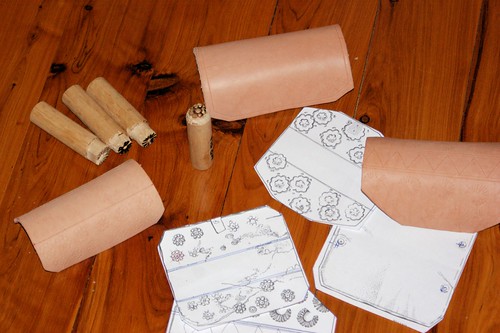
The process is simple enough. Transfer your design to the leather – because this one is to be gilt and painted, I just used plain old office carbon paper.

SONY DSC

Straight off one of the problems becomes apparent. The pockles on the right have considerably more room than those on the left. I cut the outlines with a small straight blade as we’re predating swivel knives by several hundred years.

SONY DSC

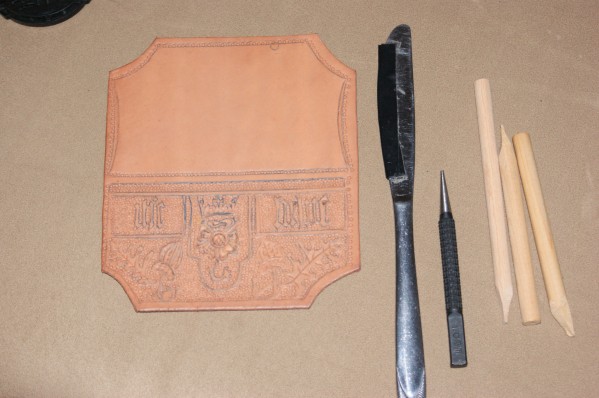
Empockelate appropriately with a 1.6mm nail punch, using kitchen utensils and home made punches as appropriate. Punch the holes for the strap, realising that they are too close to the edges and are the reason all the other holes were put in later for thong. Also realise that one hole in the drawing is too far to the right when compared to the other three. I tried swearing at this point, but it didn’t move the hole, so you can skip that if you like.

SONY DSC

DieDye.

SONY DSC

Enstrap and buckle. I either have to get faster at buckle making or give it up and buy them, I spend far too much time making the wretched things. I’ve gone with a copper alloy double oval loop buckle with moulded pin rests, making it date to between 1550 and 1650. [Whitehead, R., Buckles 1250-1800, Greenlight Publishing, Chelmsford 1996]

SONY DSC

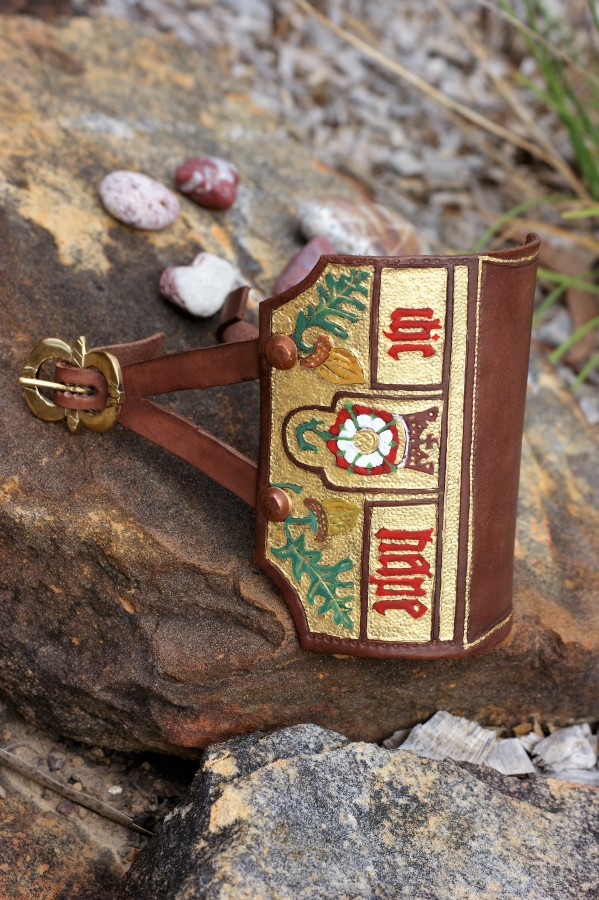
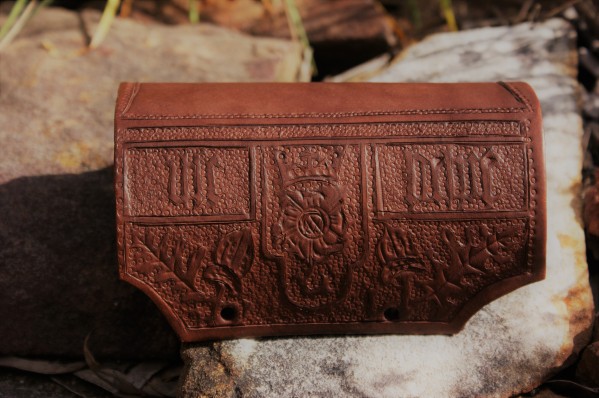
Painted bracer, it’s still a work in progress, I’ve since changed the colour of the crown.

Paint. The BM says some trace of pigment remains, having contacted them, it’s just a possible hint of red on the letters but they couldn’t tell me what the pigment was and if it was colour or bole (primer for the gilding). I’m going with colour, mainly from an ostentation point of view. Minium (red lead) substitute, rather than iron red in this case because it will be the same as on the rose. I also think the gilding is shell gold rather than leaf due to the way it sits down into the background rings and the narrow strips along the top and back would just be way too fiddly. There’s no evidence of the use of size under the gold in this case, either.

SONY DSC

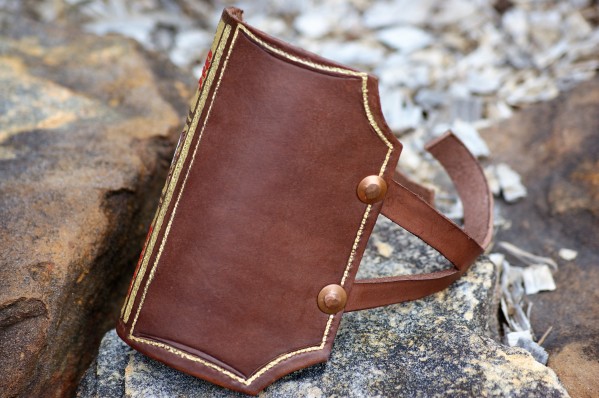
The painting on the other side is restricted to just lining.

I’m doing a Tudor rose, contemporary with the text, rather than a Yorkist white rose to match the tradition. It’s slipped and crowned (which may make it as late as Henry VIII or even Elizabeth) which didn’t happen with York white roses and I’m doing brown and ochre oak leaves and acorns, just because.

Yeah, it’s acrylic paint. Yes, I know I’ll have to apologise to Jesus, but I’ve been lead to understand that he’s fairly forgiving.

So I think I’ve finished it, it’s gone well as a fair copy of the reported illustration but I’m largely unsatisfied with it. I’ll have to have another go later.


While we’re on the subject, I need to vent a bit. The report begins on p208 of the Antiquities Journal with the sentence, “THE archer’s bracer illustrated in the fig. on p. 209 is of cuir bouilli, …” The BM repeat the assertion in their online catalogue.

I’m not sure what the fascination of antiquaries/archaeologists of this period is with cuir bouilli, they see it everywhere. Cuir bouilli, as the name implies, is a heat curing process that by its nature precludes tooling of the finished article. If you’re after more information on the subject, have a look at the late Marc Carlson’s Hardened Leather (Wayback Machine Internet Archive link) which also has some experiments on different methods.

Finished Archer’s Bracers

This post is a follow up to Archer’s Bracers and Wooden Stamps (again) of the year before last. It’s mostly me showing off, with some self-justification to explain the decisions I made about dye colours and buckles. I started writing this post in September 2014, so forgive me if things seem a little outdated.

I’m quoting from Gervase Markham’s The Art of Archerie (1634) here, mainly for my own convenience because I can cut and paste from the ebook. Markham was a publisher and like his peers, made his money from the sheer number of different titles he sold rather than the more modern approach of having fewer stronger selling titles. Accuracy, readability, veracity and respecting ownership of intellectual property were not his strong points. In this case, he’s written a new dedicatory epistle to the king, a new first chapter (A general encomion or praise of shooting both in peace and war) and then basically plagiarized the second book of Ascham’s Toxophilus when he thought everyone had stopped reading. He has modernised Ascham’s language somewhat and added the occasional paragraph of his own.

…the bracer serves for two purposes, the one to save the arm from the stripe of the string, and his doublet from wearing; and the other, that the string gliding sharply and quickly of the bracer may make the sharper shot, for if the string should light upon the bare sleeve, the strength of the shot would stop and die there…

This next bit seems to be Markham’s own work and reflects mid-17th century practice rather than 16th c, Ascham is silent on the appropriate types of leather.

The bracers are made for the most part of Spanish leather, the smooth side outward, and they be the best, sometimes of Spanish leather and the flesh side outward, and they are both good and tolerable, and others are made of hard, stiff but smooth bend leather, and they be the worst and most dangerous, and thus much is spoken of the bracer.

When looking at the Mary Rose bracers, all are skin side outwards and only a couple are candidates for being of Spanish leather. I’ve used harness butt for all mine, it’s thick, flexible and takes stamping well. Most of the Mary Rose bracers are rectangular or octagonal, with a couple having curves on the long sides. I made a couple of each design, patterns were just the drawings from the MR book blown up to life size on a photocopier. Cut out the leather, case it and decorate with the stamps you made two years ago. Attack with the back of the butter knife if your design needs it. You may have done that two years ago as well…

Buckle, strap and pattern

Buckle and strap

Cut the straps to the correct width to fit the actual or hypothetical buckle and punch the holes for the rivets and mounting the buckle. I used a thin 1.5mm carving leather for the straps on the commercial buckles and a 3mm on the ones I’d made. “Y” shaped straps can be made by splitting a straight strap for part of its length, dampening the branching area and then stretching and squeezing to shape.

Dye the bits as required with your choice of leather dye. I used red on a couple to represent Spanish leather (the red colour came from a step in the tanning process), the majority are black or brown.

Buckles

Mild steel buckles

My bracer has a forged buckle, but to show what you can do at home, I made these from a piece of 1.6mm sheet mild steel I’d picked up from the local hardware. The shapes are entirely hypothetical because none of the Mary Rose bracer buckles have survived. The holes have been drilled and then opened up with files. On some of the square ones, I stitch drilled and then cut the webs with a cold chisel. Decoration is with sharp or blunt cold chisels and a centre punch. The buckle tongues are horseshoe nails with the heads cut off and then bent to an appropriate shape. Don’t forget to clean and debur the front and back.

The finish is a simple heat blue, a stable oxide of iron. I use a similar process to this, either using a propane torch or gas ring depending on what the gas bottle is connected to, but finish with a spray oil rather than a dip. Just do it outside and don’t breathe the fumes. You can blue in your oven if it can heat to 290°C/550°F.

Assemble all the bits using copper harness rivets (the impressions in the leather match the Mary Rose examples) and wax or seal to taste.

This slideshow requires JavaScript.

Archer’s Bracers and Wooden Stamps (again)

I’ve talked about how easy it is to make wooden stamps a few times in the past. Here, here and here come to mind. I’m making some archer’s bracers based on Mary Rose originals to sell through Sven the Merchant and thought I’d take the opportunity to demonstrate a couple of techniques I use.

As before, the base for the stamp is tassie oak dowel, I like using this one because it is hard, has very fine end grain and can be easily heat hardened.

For most of the stamps, I created the stamp outlines on my PC at full size, reversed the original design and then printed them. After that I cut out the designs and glued them to the ends of the dowels.

Wooden stamps for Mary Rose Bracers

From left to right, stamps for Mary Rose 81A1185, 81A4639, 80A0901 and one marked up for 81A5826. I’ll cover that technique next.

Remove everything that isn’t stamp with saw, knife, chisel and/or drill, case the leather and start stamping to taste.

The second method is for the simpler stamp used on 81A5826, it needed a 3/8″ hole in the middle, surrounded with 1/8″ holes. I just marked up the centre and at 45° intervals and applied a centre punch and power drill.
Wooden stamp reject

The centre hole went a bit wonky, so I turned the dowel over and did it again on the other end.

Wooden stamps for Mary Rose Bracers

Much better this time.

Bracers, stamps and designs.

Stamps, bracers and templates everywhere. Just straps and buckles to go.

If you have Weapons of Warre, have a look at the section on bracers by Hugh Soar in Volume 2. You’ll see some finished ones here soon.

Where is it?

Try this quick quiz…

I need help. Where is this bracer? It is in one of the UK Musea, but the image and text files on my PC have become separated and I can no longer identify it. It is another example of an item of English manufacture decorated with fleur de lys

There’s a couple the same shape from the Mary Rose, but this isn’t from there. I think the period is late Elizabeth to Commonwealth, and the file name is AN00464658_001.jpg if that helps.

All you’ll get is a warm feeling and my gratitude.

Mary Rose Leather Gallery

I’ve finally managed to get organised enough to upload my photos from the Mary Rose Museum. “Mary Rose leatherwork”, or a variant on that theme is in the top 5 searches on this blog nearly every day, so there seems to be some demand for it. The museum features very low light to protect the finds from UV degredation, so the colour in the photos tends to be a bit muddy. Some of them have had a lot of work to pull the image from what at first appeared to be a black frame.

I’ve arranged the photos by item type, starting with archery equipment and then move on to other items. You may have seen some of these photos before but hopefully most of them will be new. The photos also link through to my Flikr account. I’ll update the descriptions when more information becomes available.

Archery Equipment

Archer's arm guard

Leather bracer embossed with the royal arms of Henry VIII.

Two archer's arm guards

Left: Ivory bracer with leather straps. Right: leather bracer, with stamped rosettes.

Leather Mitten 81A3292

Left hand mitten (both mittens found were for the left hand). I suspect these were used to protect the bow hand when shooting fire arrows from a longbow. The triangular shape of the thumb cut out can be clearly seen.

Mary Rose leather mitten 81A3292 1545

Fingertip detail of left hand mitten (both mittens found were for the left hand). 260mm long, 150mm wide at widest point. Unidentified leather, the other one found (81A3292 was sheepskin). The leather was stitched with the flesh sides together, then turned inside out so the seams were hidden/protected.

Mary Rose arrow spacer

Mary Rose arrow spacer. These would commonly be used with a linen canvas bag and be slung off a waist belt.

Mary Rose Arrow Spacer 1545

Mary Rose arrow spacer with the remains of arrow shafts in situ. These would commonly be used with a linen canvas bag and be slung off a waist belt.

Leather Bottles and Buckets

MR 79A1232

Back of Mary Rose leather flask 79A1232, 282mm high, 213mm wide and 57mm deep. Stitching is original and there is still some sealing pitch present. This bottle is asymetrical - the front is much more deeply curved than the back.

Mary Rose leather bottle 81A0881

Mary Rose leather bottle of the costrel form, 81A0881. Front is decorated with three vertical ridges with a double zigzag pattern between the ridges and to either side. There are several pairs of parallel tooled lines including a large inverted V and various rectangles on the base and back. The inside is coated with an unidentified subastance. The photo was taken in low-light conditions inside the museum, colours may not be accurate.

Mary Rose leather bottle 81A1214

Mary Rose leather bottle of the costrel form, 81A1214 was found in a chest along with some personal items and woodworking tools. Front and back are decorated with five pairs of parallel lines from top to bottom, framed by a horizontal line at the base and two parallel lines across the shoulders and neck. There are two asterisks on the base, with a saltaire cross (X) diagonally between them, and a saltaire cross on each end. There are reinforcing pieces in the shoulders/lugs and a gasket piece around the inside of the neck. There is the remains of a waterproof coating on the inside surface.

Reconstructed Mary Rose leather bucket

Reconstructed Mary Rose leather bucket. The leather buckets all have rust marks from iron handle rings and some have the remains of pitch sealing, indicating they were water rather than powder buckets.

Mary Rose Leather Bucket handle detail

Mary Rose Leather Bucket handle close-up

Footwear

Mary Rose type 1 shoe construction

Height separated welted shoe components from the Mary Rose (possibly 81A1861) showing the way the layers go together. The colour of the label corresponds to the colour code on the chart behind.

Assorted shoe parts

Assorted shoe parts found in the 2002/3 dig.

Mary Rose type 1 shoe quarter

Shoe quarter from a type 1 shoe, displaying a topband in place.

Mary Rose type 1 shoe

Type 1 shoe (high slip on with the throat raised by the extension of the front of the quarters).

Mary Rose type 1 & 2 shoes

Museum display showing the differences between type 1 (high slip ons with the throat raised by the extension of the front of the quarters) and type 2 (slip on shoes with straight throated vamp and straight top edge on the quarters.

Shoe sole made from old bucket

Replacement partial shoe sole cut from an old bucket. The lines of stitching can be clearly seen, and can the incised arrow marking it as the king

Shoe sole cut from old bucket

Replacement partial shoe sole cut from an old bucket. The shaded area indicates which part of the bucket the sole was cut from.

Mary Rose find 79A0877 Type 3 thighboot

Mary Rose type 3 thighboot (rounded toe, turn/welt construction, secured with four straps), there

Mary Rose find 79A0877 Type 3 thighboot

Mary Rose find 79A0877 type 3 thighboot (rounded toe, turn/welt construction, secured with four straps), outer and innersole. There

Scabbards and Furniture

Mary Rose scabbards and furniture

A display of leather scabbards from bollock knives (top, centre) and a rapier (bottom) together with the copper alloy fillings used to support them.

Mary Rose Rapier Scabbard

Rapier scabbard with incised decoration and hanging strap.

Mary Rose Rapier Scabbard

Mid-section of rapier scabbard with incised decoration and hanging strap.

Mary Rose Bollock Knife Scabbard with stamped decoration

Mary Rose bollock knife scabbard with stamped decoration, the scabbard has two compartments, one for the bollock knife and one for a by-knife.

Pouches

Type 1 leather pouch 81A2685

Fine embossed bovine leather, 275mm x 190mm showing the inner flap and the inside of the outer flap. Outer flap is lined with silk, the inner flap is two layers of leather stitched with the skin sides together.

Type 1 leather pouch 81A2685

Detail of the silk inside of the outer flap of 81A2685, 275mm x 190mm. False colours due to low light levels in the museum.

Type 1 pouch and unknown type pouch

Top:An unidentified Type 1 Leather pouch Bottom: An unidentified leather pouch.

Mary Rose Type 1 Leather pouch 81A1991

Fine embossed calf leather, 278mm x 197mm. The inner flap is plain. Type 1 pouches have two sections for storage, the larger is the same width and height as the outside of the pouch, the smaller is stitched in position between the inner and outer flap. Unlike the other type 1s, this one has a third pouch in front of the others.