
When dealing with digital images, understanding their dimensions and quality is crucial for various applications, ranging from web design to printing. The 680 x 240 pixel image converter is a tool that deals specifically with images of these dimensions. The ratio for a 680 x 240 image is approximately 17:6, which is a wide rectangular shape, not commonly used in standard media formats. This aspect ratio is quite unconventional, which can make it interesting for specific design purposes or to create a unique visual effect on websites or digital platforms.
The resolution of an image this size, measured in pixels, directly relates to its pixel density—the number of pixels per unit of physical space on a screen. Higher pixel density means a sharper image, while a lower pixel density can result in a more pixelated appearance. When converting images to this specific resolution of 680px by 240px, one should be aware of the image’s original aspect ratio to avoid distortion. Adjustments to the aspect ratio, if needed, should be made carefully to maintain the image’s overall quality.
To make a 680px by 240px photo, image editing software can resize the picture while allowing you to maintain its original clarity as much as possible. Ensuring that the image remains visually pleasing after resizing is important, especially if it’s for professional use on the web or in print, where clear imagery can make a significant difference in audience perception.
Key Takeaways
- Aspect ratio and resolution are key factors in the quality of a 680px by 240px image.
- Converting an image to these dimensions requires careful adjustment to avoid distortion.
- Preserving the original quality in the resized image is essential for both web and print applications.
Understanding Image Basics
Before diving into the specifics of a 680px by 240px image, it’s essential for us to grasp the fundamental concepts that dictate image characteristics such as resolution, aspect ratio, and pixel density. These factors are vital in understanding how images are formed and how they can be manipulated to suit specific requirements.
Resolution and Quality
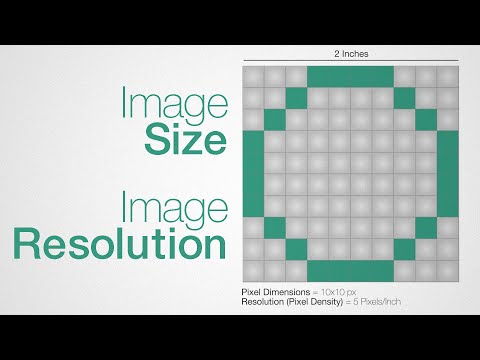
Resolution refers to the total number of pixels displayed on an image, represented as width x height. These pixels are the smallest controllable elements of a picture on the screen. When we talk about a 680 x 240 pixel image, we are discussing a resolution with 680 pixels in width and 240 pixels in height. Higher resolution typically correlates with higher image quality because more pixels provide finer detail.
The measure of the number of pixels in a physical area, known as dpi (dots per inch) or more accurately ppi (pixels per inch), indicates pixel density. An image with a higher dpi/ppi will generally have a higher quality because the pixels are more densely packed, reducing visible pixelation.
Common Aspect Ratios
Aspect ratio describes the proportional relationship between the width and height of an image. It’s an essential element when considering the layout and framing of an image. Here are a few common aspect ratios and what they usually represent:
- 16:9: This is widely used in televisions and monitors—ideal for widescreen viewing.
- 4:3: Once screen standard resolution before widescreen formats became prevalent.
- 16:10: Often seen in computer displays, giving slightly more vertical space than 16:9.
- 1:1: A square-shaped image; commonly used for social media profile pictures.
When discussing a 680 x 240 pixel image, the aspect ratio is calculated by dividing the width by the height, which gives you 2.83:1. This is not a standard aspect ratio for most media and might be used for panoramic views or custom graphic design work. It is beneficial to maintain consistent aspect ratios for images to ensure they fit well within various display contexts without needing significant adjustments.
Converting to 680px x 240px
When we need to adjust images to specific web requirements or format settings, converting their dimensions to precisely 680px in width by 240px in height is crucial. This ensures that the image will maintain its aspect ratio and quality when resized.
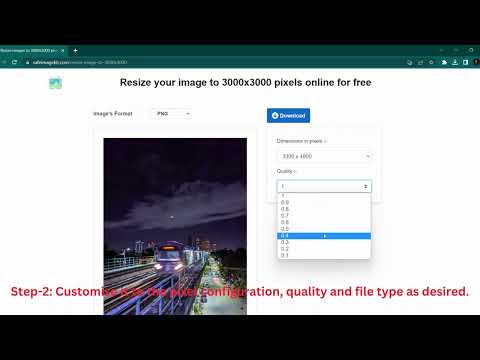
Using Online Converters
For quick conversion without downloading any software, we can make use of online converters. These tools often allow free conversion and are simple to use:
- Navigate to a reputable online image converter.
- Upload the image file from our device or cloud storage.
- Set the custom dimensions to 680px width and 240px height.
- Ensure that the aspect ratio is maintained to prevent distortion.
- Choose the desired image file format (jpg, png, tiff, bmp).
- Convert the image and download the resized file.
Online converters are beneficial as they offer a convenient and immediate solution without the necessity for installation or registration, streamlining the process when we’re in a rush.
Conversion with Software
If we prefer more control over the conversion process or need advanced options like bulk editing or specific image adjustments, software like Adobe Photoshop (PS) can be used:
- Open the image in the software.
- Go to the ‘Image’ menu and select ‘Image Size’.
- Input 680 for the width and 240 for the height in the appropriate fields.
- Confirm that ‘Constrain Proportions’ or ‘Maintain Aspect Ratio’ is checked.
- Choose the appropriate resolution and pixel density if needed.
- Once the dimensions are set, save the image in the desired format (jpg, png, tiff, bmp).
Using software grants us greater flexibility and the ability to manage large batches of images, optimize file sizes for various platforms, or store them in high-quality formats for future use.
Optimizing Image for Web and Print
When optimizing images for web and print, it’s crucial to understand the nuances of pixel density and image file formats. The right choices in these aspects ensure your images display well in various media.
Pixel Density and Print Size
For print, dots per inch (dpi) is a critical measure, indicating how many dots of ink are printed per inch. Generally, a higher dpi results in a clearer and sharper image. The standard for high-quality print is typically around 300 dpi, which often translates to professional-looking prints.
However, the pixel per inch (ppi) is essential for digital displays, and it’s different from dpi. Ppi refers to the density of pixels in an image, which affects its clarity on screens. An image of 680px by 240px could be sized differently for print. We use a pixels to print size calculator to determine the right dimensions for printing, ensuring that our pixel dimensions yield the necessary clarity, especially when the original image is intended for on-screen use.
| Print Size (inches) | Pixels at 300 dpi |
|---|---|
| 6 x 2 | 1800 x 600 |
| 3 x 1 | 900 x 300 |
| 2.27 x 0.8 | 680 x 240 |
Image File Formats and Their Uses
The image file format greatly influences file size and image quality. Raster image formats, like JPG, PNG, and GIF, are made up of a fixed number of pixels. They are commonly used across the web due to their small file size and wide compatibility.
- JPG: Best for photographs and realistic images; it uses lossy compression, which can reduce file size but also degrade quality.
- PNG: Ideal for images with text, transparent backgrounds, or needing lossless compression.
- GIF: Used mainly for simple animations and supports a limited color palette.
For web use, we also consider modern formats like WebP, as it offers good quality with smaller file sizes, increasing page load speeds. It’s crucial to balance image quality and file size because excessively large images can slow down websites, while over-compression can degrade image quality.
In contrast, vector image formats such as SVG are resolution-independent and ideal for logos and graphic illustrations. Their scalability makes them perfect for both print and web without any loss of quality, and their edited size directly affects the visual crispness in a way raster images do not.
Through careful consideration of these factors, we can optimize our images successfully for both web and print, balancing quality and functionality.
Advanced Topics in Image Conversion

Before diving into the specifics of image conversion, it’s essential to understand the differences between raster and vector graphics as well as the concept of custom aspect ratios and resolutions, which are pivotal for precise conversion.
Understanding Raster vs. Vector
Raster images are pixel-based; each pixel has a specific color value, making these formats ideal for complex images with gradients and shading, such as photographs. Common raster image formats include JPEG, GIFs, PNG, TGA, and EXR. When dealing with a 680px x 240px photo, we’re considering a raster image where the total resolution is exactly 163,200 pixels. While vector images store data as paths, which allows for seamless scaling without a loss of clarity. Formats like SVG or AI are common vector formats. They’re perfect for logos or text graphics where crisp edges are paramount.
Key Considerations for Raster Images:
- Pixel Density: This refers to the number of pixels per inch (PPI). For a 680×240 image, pixel density would affect clarity when printed.
- Resolution: A resolution like 1920×1080 is considered full HD (also termed as 2K), and it follows a 16:9 aspect ratio, which is vastly different from the 680×240 ratio of approximately 17:6.
Custom Aspect Ratios and Resolutions
We often encounter custom aspect ratios, like a unique 680×240 ratio, which doesn’t confirm to standard sizes like 16:9 or 4:3. Here’s a simple formula to calculate this ratio:
- Divide the width by the greatest common divisor (GCD) of both dimensions.
- Divide the height by the same GCD.
- The resulting figures form the aspect ratio.
For example, the aspect ratio of a 2K resolution (2048×1080) would simplify from a proportion standpoint to approximately 1.9:1. When converting images to or from custom sizes, maintaining the original proportion is crucial to avoid distortion. Tools for conversion should ideally allow specification of both width and height independently. When working with resolutions like 680×240, understanding this ratio is key to avoiding unnecessary stretching or compressing of the image.
In summary, our approach to image conversion hinges on differentiating between raster and vector image qualities—each with its own set of considerations—and employing proper formulas and tools to maintain aspect ratios and resolutions tailored to our needs.

